Ceiling fans are one of the most practical and cost-effective upgrades you can add to your home. They improve air circulation, increase comfort, reduce energy costs, and enhance the overall look of your space. Whether installed in bedrooms, living rooms, kitchens, or outdoor patios, ceiling fans provide both functionality and style.
However, installing a ceiling fan requires more than simply hanging a fixture from the ceiling. Proper electrical wiring, secure mounting, and correct placement are essential to ensure safety and long-term performance.
In this in-depth guide from Builtup Home, you will learn everything about ceiling fan installation, including planning, tools required, step-by-step instructions, safety precautions, installation tips, and maintenance recommendations.
What Is Ceiling Fan Installation?
Ceiling fan installation is the process of mounting a ceiling fan to the ceiling structure and connecting it to your home’s electrical system. Unlike standard light fixtures, ceiling fans produce constant movement and vibration. Because of this, they must be mounted on a fan-rated electrical box that is specifically designed to support heavier loads and rotational motion.
A properly installed ceiling fan ensures:
- Safe electrical operation
- Strong structural support
- Balanced rotation without wobbling
- Efficient airflow throughout the room
Incorrect installation can lead to issues such as fan wobbling, electrical hazards, noise, or even structural damage to the ceiling.
Why Install a Ceiling Fan in Your Home?
Many homeowners install ceiling fans to improve comfort and reduce energy costs. Here are the most important benefits.
1. Better Air Circulation
Ceiling fans move air around the room to improve overall airflow. During the summer, they create a wind-chill effect that makes the room feel cooler without lowering the thermostat.
During winter, reversible fans push warm air that rises to the ceiling back down into the room.
2. Energy Savings
Using a ceiling fan allows homeowners to increase their thermostat setting by a few degrees without sacrificing comfort. This can significantly reduce air conditioning costs during hot seasons.
Many energy experts estimate that ceiling fans can reduce cooling costs by up to 15–20 percent when used properly.
3. Improved Room Comfort
Ceiling fans eliminate hot and cold spots by distributing air evenly throughout the room. This makes indoor environments feel more comfortable and consistent.
4. Decorative Design Element
Modern ceiling fans are available in hundreds of designs, including:
- Contemporary styles
- Rustic wooden fans
- Minimalist designs
- Smart fans with LED lighting
This makes ceiling fans both functional and decorative.
5. Multi-Functional Lighting
Many ceiling fans include integrated lighting fixtures, combining both lighting and airflow in one appliance.
Types of Ceiling Fans
Before installation, it’s important to choose the right type of fan for your space.
Standard Ceiling Fans
These are the most common fans used in bedrooms, living rooms, and dining areas. They typically include a downrod that suspends the fan from the ceiling.
Low-Profile (Flush Mount) Fans
Low-profile ceiling fans are ideal for rooms with low ceilings, as they attach directly to the ceiling without using a downrod.
Outdoor Ceiling Fans
Outdoor fans are designed to withstand moisture, humidity, and weather conditions. They are ideal for:
- Porches
- Patios
- Gazebos
- Covered outdoor areas
Smart Ceiling Fans
Smart fans connect to Wi-Fi or smart home systems, allowing control through smartphones or voice assistants.
Features may include:
- App control
- Voice commands
- Temperature sensors
- Smart scheduling
Tools and Equipment Required to Install a Ceiling Fan
Make sure to collect all the required tools before beginning the installation process.
Basic Tools
- Ladder or step stool
- Screwdrivers (Phillips and flathead)
- Adjustable wrench
- Wire strippers
- Pliers
- Drill and drill bits
- Voltage tester
Materials Required
- Ceiling fan kit
- Fan-rated electrical box
- Mounting bracket
- Wire nuts
- Electrical tape
- Screws and anchors
Having all tools ready beforehand helps prevent interruptions during installation.
Important Safety Precautions
When working with electrical systems, safety must always come first.
Turn Off Power Completely
Always turn off power from the main circuit breaker, not just the wall switch. Use a voltage tester to verify that the wires are free of electrical current.
Use a Fan-Rated Electrical Box
Standard light fixture boxes are not designed to handle the weight and motion of a ceiling fan. Installing a fan on an unsupported box can be dangerous.
Fan-rated boxes are specifically designed to support 35 to 70 pounds or more.
Secure Mounting
The electrical box must be firmly attached to a ceiling joist or support brace. This prevents the fan from loosening over time.
Follow Manufacturer Instructions
Each ceiling fan model may include slightly different installation instructions. Always consult the manufacturer’s guide prior to starting the process.
Choosing the Best Location for Ceiling Fan Installation
The placement of the ceiling fan significantly affects airflow and performance.
Recommended Placement Guidelines
- Fan blades should be 7 to 10 feet above the floor
- At least 18 inches away from walls
- 8 to 12 inches below the ceiling
- Positioned near the center of the room
For sloped ceilings, angled mounting kits may be required.
Step-by-Step Ceiling Fan Installation Process
Installing a ceiling fan can be completed in several stages.
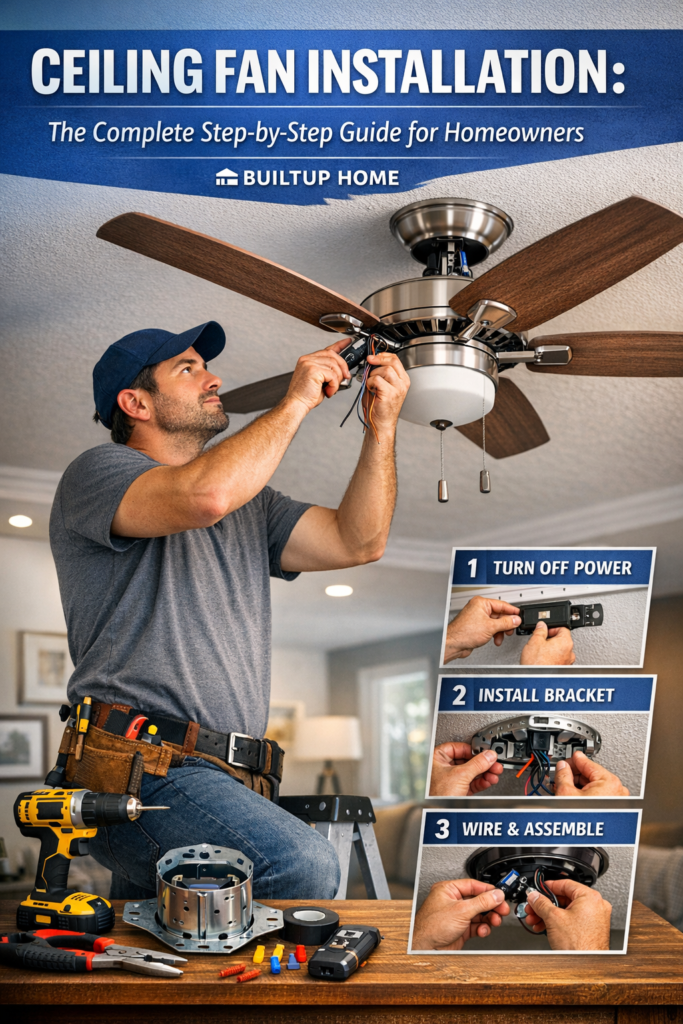
Step 1: Turn Off the Electricity
Go to your home’s circuit breaker panel and switch off the breaker connected to the room where the fan will be installed.
Use a voltage tester to confirm that the wires are not carrying electricity.
Step 2: Remove the Existing Fixture
If replacing an old light fixture:
- Remove bulbs and covers.
- Unscrew the fixture base from the ceiling.
- Disconnect the wiring.
Carefully lower the fixture and set it aside.
Step 3: Install a Fan-Rated Electrical Box
If the existing electrical box is not rated for ceiling fans, replace it with a stronger one.
Steps include:
- Remove the old box.
- Install a fan-rated box attached to a ceiling joist or support brace.
- Secure the box tightly.
This step is critical for long-term safety.
Step 4: Install the Mounting Bracket
The mounting bracket supports the fan motor.
- Align the bracket with the electrical box.
- Attach it using the provided screws.
- Ensure the bracket is tightly secured.
Step 5: Assemble the Ceiling Fan
Before mounting, partially assemble the fan.
Common assembly steps include:
- Attaching the downrod
- Feeding wires through the rod
- Securing the motor housing
Some fans also require blade brackets to be installed beforehand.
Step 6: Hang the Fan Motor
Lift the fan motor and place it onto the mounting bracket. Most brackets include a temporary hook or slot to hold the fan while wiring is connected.
Step 7: Connect the Electrical Wiring
Typical ceiling fan wiring connections include:
- Black wire – Fan power
- Blue wire – Light power
- White wire – Neutral
- Green or copper wire – Ground
Use wire nuts to secure the connections and tuck the wires neatly into the electrical box.
Step 8: Attach the Canopy
The canopy is the decorative cover that hides the wiring and bracket.
Lift the canopy and secure it to the mounting bracket using screws.
Step 9: Install Fan Blades
Attach each blade to the motor using the provided blade brackets and screws.
Make sure:
- Screws are tightened evenly
- Blades are aligned properly
This prevents wobbling.
Step 10: Install the Light Fixture
If your fan includes lighting:
- Connect the light wires.
- Attach the light kit.
- Install bulbs and glass covers.
Step 11: Restore Power and Test the Fan
Switch the circuit breaker back on and check that the fan is working properly.
Check:
- All speed settings
- Lighting functionality
- Remote control or wall switch
Ensure the fan runs smoothly without vibration.
Common Ceiling Fan Installation Problems
Even small mistakes can cause issues.
Fan Wobbling
This is usually caused by:
- Loose screws
- Unbalanced blades
- Improper mounting
Fan Not Working
Possible reasons include:
- Incorrect wiring
- Loose wire connections
- Faulty switch or capacitor
Excessive Noise
Noise can occur due to:
- Loose parts
- Poor mounting
- Dust buildup
How Long Does Ceiling Fan Installation Take?
Installation time depends on the situation.
| Installation Type | Time Required |
| Replace existing fan | 30–60 minutes |
| Replace light fixture with fan | 1–2 hours |
| Install new wiring | 2–4 hours |
Professional electricians can usually complete the job faster.
Average Cost of Ceiling Fan Installation
Costs vary depending on complexity and location.
| Installation Type | Estimated Cost |
| Basic installation | $100 – $200 |
| Installation with new wiring | $200 – $400 |
| Smart fan installation | $300 – $500 |
Labor costs may vary depending on the electrician and region.
Maintenance Tips After Installation
To keep your ceiling fan working efficiently:
- Clean blades regularly to remove dust
- Tighten screws once or twice a year
- Check blade balance if wobbling occurs
- Replace remote batteries when needed
- Inspect wiring connections occasionally
Proper maintenance can extend the life of your ceiling fan by many years.
Frequently Asked Questions (FAQs)
Can I install a ceiling fan myself?
Yes, many homeowners install ceiling fans themselves. However, if electrical wiring or ceiling support is complicated, hiring a professional electrician is recommended.
Do ceiling fans require special electrical boxes?
Yes. Ceiling fans must be installed on fan-rated electrical boxes designed to support their weight and movement.
What size ceiling fan do I need?
Room size determines fan size:
- Small rooms: 29–36 inches
- Medium rooms: 42–48 inches
- Large rooms: 52 inches or more
Why does my ceiling fan wobble?
Fan wobbling usually occurs due to loose screws, uneven blades, or improper installation.
Can ceiling fans help reduce energy bills?
Yes. Ceiling fans improve airflow, allowing you to raise your thermostat and reduce air-conditioning usage.
Final Thoughts
Ceiling fan installation is a valuable home improvement project that enhances airflow, increases comfort, and adds visual appeal to your space. With the right tools, preparation, and attention to safety, many homeowners can install a ceiling fan successfully.
However, if you are unsure about electrical wiring or structural support, hiring a professional electrician is always the safest option.
For more expert home improvement guides, design inspiration, and practical DIY tips, visit Builtup Home — your trusted resource for modern living solutions.