Painting a room is one of the most cost-effective ways to completely transform your home. Whether you’re refreshing faded walls, changing the mood of a space, or preparing your home for sale, a properly executed paint job can dramatically improve appearance and value.
While painting may seem simple, achieving smooth, professional results requires careful planning, correct materials, proper preparation, and disciplined technique. This comprehensive guide breaks down every step in detail — from choosing paint to final cleanup — so you can confidently complete your project like a pro.
1. Planning Before You Start
Define the Purpose of the Room
Before selecting paint, consider how the room is used:
- High-traffic areas (hallways, living rooms) need durable finishes.
- Kitchens and bathrooms require moisture-resistant paint.
- Bedrooms benefit from softer, calming tones.
- Children’s rooms need washable finishes.
The room’s function influences both the color and finish you choose.
2. Choosing the Right Paint
Paint Types
Water-Based (Latex) Paint
- Dries quickly
- Low odor
- Easy to clean with water
- Ideal for most interior walls
Oil-Based Paint
- Extremely durable
- Smoother finish
- Longer drying time
- Best for trim, doors, and cabinets
For most room walls, high-quality latex paint is recommended.
Paint Finishes Explained
The finish affects both appearance and durability:
| Finish | Appearance | Best For |
| Matte/Flat | No shine | Ceilings, low-traffic areas |
| Eggshell | Soft sheen | Living rooms, bedrooms |
| Satin | Slight gloss | Hallways, family rooms |
| Semi-Gloss | Noticeable shine | Kitchens, bathrooms, trim |
| Gloss | High shine | Doors, cabinets |
Higher sheen = easier cleaning but highlights imperfections.
Lower sheen = hides flaws but less washable.
3. Tools & Materials Checklist
Using the right tools improves speed and quality.
Essential Tools
- High-quality angled brush (2–2.5 inches)
- Roller frame and roller covers (3/8” nap for smooth walls)
- Extension pole
- Paint tray with liners
- Drop cloths (canvas preferred over plastic)
- Painter’s tape
- Sandpaper (120–220 grit)
- Putty knife
- Wall filler or spackle
- Ladder
- Stir sticks
- Paint can opener
Investing in good brushes and rollers makes a significant difference in final results.
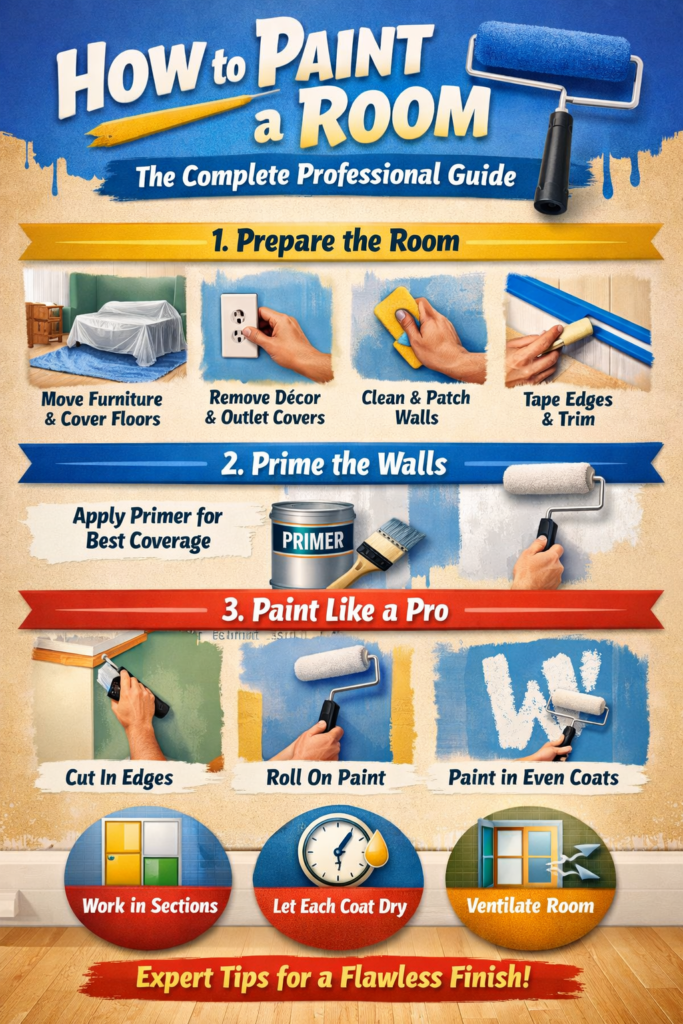
4. Room Preparation (Most Important Step)
Experienced painters typically dedicate more time to surface preparation than to applying the actual paint.
Step 1: Clear the Room
- Remove as much furniture as possible.
- Move remaining items to the center and cover with drop cloths.
- Take down curtains and wall decorations, and carefully remove switch plates and outlet covers before starting the painting process.
Step 2: Protect Surfaces
- Lay drop cloths on floors.
- Tape baseboards, window trim, and ceiling edges.
- Press tape firmly to prevent bleed-through.
Step 3: Repair Wall Imperfections
- Fill nail holes and cracks with spackle.
- Let dry completely.
- Sand smooth until flush with the wall.
- Wipe dust with a damp cloth.
Step 4: Clean the Walls
Dirt, oil, and built-up residue can interfere with proper paint adhesion, leading to uneven coverage and potential peeling.
- Use mild soap and water.
- For kitchens, use degreaser if necessary.
- Allow walls to fully dry before painting.
Skipping cleaning often leads to peeling later.
5. Should You Use Primer?
Primer is not always mandatory, but it is highly recommended when:
- Painting over dark colors
- Covering stains
- Painting new drywall
- Switching paint types
- Repairing patched areas
Primer:
- Improves adhesion
- Reduces number of coats needed
- Provides uniform color
Ensure the primer has fully dried and cured before applying the first coat of paint to achieve optimal adhesion and a smooth finish.
6. Proper Painting Technique
Step 1: Paint the Ceiling First
If painting both ceiling and walls:
- Start with ceiling to avoid drips on fresh walls.
- Use a flat finish for ceilings.
Step 2: Cut In Edges
“Cutting in” means painting edges with a brush before rolling.
- Use an angled brush.
- Paint 2–3 inches along corners, ceiling line, and trim.
- Work in sections to keep edges wet for blending.
Take your time here — clean edges define the job quality.
Step 3: Rolling the Walls
Load Roller Properly
- Dip roller in tray.
- Move the roller back and forth across the tray to evenly load and distribute the paint before applying it to the wall.
- Do not overload.
Apply Using the “W” Method
- Roll a large “W” shape.
- Fill it in without lifting roller.
- Overlap slightly into previous section.
- Maintain a wet edge to prevent lap marks.
Work in Manageable Sections
- Complete one wall at a time.
- Avoid stopping halfway through a wall.
7. Drying and Second Coat
Most rooms require at least two coats.
Drying Time
- Latex paint: 2–4 hours between coats
- Oil-based paint: 6–8+ hours
Follow manufacturer instructions.
Do not rush this step — applying a second coat too early can ruin the finish.
8. Avoiding Common Painting Mistakes
1. Skipping Prep
Results in peeling and uneven finish.
2. Using Cheap Tools
Leads to brush streaks and lint in paint.
3. Overworking the Paint
Rolling too much after paint starts drying causes patchiness.
4. Painting in High Humidity
Slows drying and affects adhesion.
5. Not Mixing Multiple Cans
Always “box” paint (mix multiple cans in one bucket) to ensure consistent color.
9. Removing Tape & Finishing Touches
Removing Painter’s Tape
- Remove while paint is slightly tacky.
- Pull at a 45-degree angle.
- Use a utility knife if edges stick.
Inspect the Walls
- Check for missed spots.
- Touch up carefully using small brush.
10. Cleanup & Maintenance
Cleaning Tools
- Latex paint: wash with warm water and soap.
- Oil-based: requires mineral spirits.
Proper Paint Storage
- Seal lid tightly.
- Store in cool, dry place.
- Label with room and date.
Proper storage allows easy future touch-ups.
11. How Long Does It Take to Paint a Room?
For an average 10×12 ft room:
- Preparation: 3–5 hours
- Painting (2 coats): 4–6 hours
- Total project time: 1–2 days including drying
Professionals may complete it faster due to experience.
12. Cost Breakdown
DIY painting typically costs:
- Paint: $30–$70 per gallon
- Supplies: $50–$150
- Total average room cost: $100–$300
Hiring professionals may cost $300–$800+ depending on location and room size.
DIY saves money but requires time and effort.
13. Professional Tips for a Perfect Finish
✔ Paint in natural daylight when possible
✔ Keep windows slightly open for ventilation
✔ Stir paint every 20–30 minutes
✔ Use extension pole for smoother rolling
✔ Keep a damp cloth nearby for quick wipe-ups
Final Thoughts
Painting a room is more than just applying color — it is a process that combines preparation, patience, and proper technique. When done correctly, it transforms your space, enhances atmosphere, and adds value to your home.
Frequently Asked Questions (FAQs)
1. How long does it take to paint a room?
Painting a standard 10×12 ft room typically takes 1–2 days. Preparation may take several hours, while applying two coats of paint requires proper drying time between coats. Hurrying through the job can compromise the overall quality and smoothness of the final result.
2. Do I need to use primer before painting?
Primer is recommended if:
- You are covering a dark color with a lighter one.
- The wall has stains or repairs.
- You are painting new drywall.
- You want better durability and smoother finish.
In some cases, paint-and-primer combinations may reduce the need for separate primer.
3. How many coats of paint are required?
Most rooms require two coats for even coverage and rich color. Dark colors or drastic color changes may require a third coat for full opacity.
4. What is the best paint finish for interior walls?
- Matte/Flat: Best for ceilings and low-traffic rooms.
- Eggshell/Satin: Ideal for living rooms and bedrooms.
- Semi-gloss: Perfect for kitchens, bathrooms, and trim due to moisture resistance.
The best choice depends on durability needs and lighting.
5. Should I paint the ceiling or walls first?
Always paint the ceiling first. This prevents paint drips from damaging freshly painted walls.
6. How do I avoid roller marks and streaks?
- Use high-quality rollers.
- Apply paint in a “W” pattern.
- Maintain a wet edge.
- Avoid overworking partially dried paint.
These techniques ensure smooth, professional-looking walls.
7. Can I sleep in a freshly painted room?
It’s best to wait a minimum of 24 hours before sleeping in a newly painted room to allow fumes to dissipate and the paint to dry properly. Ensure proper ventilation to reduce fumes, especially when using oil-based paint.
8. What temperature is best for painting indoors?
The ideal indoor temperature for painting is between 50°F and 85°F (10°C to 30°C) with low humidity. Very high or low temperatures can interfere with paint drying and prevent proper adhesion to surfaces.
9. How much paint do I need for one room?
On average:
- 1 gallon covers approximately 350–400 square feet.
- A standard bedroom typically needs 1–2 gallons for two coats.
Measure wall area accurately to avoid shortages.
10. Is it better to use a brush or roller for walls?
Rollers are best for large wall areas because they provide even coverage quickly. Brushes are used for edges, corners, trim, and detailed work.