Kitchens require different layers of lighting to ensure functionality and comfort. Can lights play a significant role because they provide bright and even illumination without creating unnecessary clutter. Here’s why they are essential:
- Enhanced Visibility – Properly placed can lights eliminate shadows, making it easier to prepare food, clean, and perform other kitchen tasks.
- Aesthetic Appeal – Recessed lights create a sleek, modern look, making your kitchen appear more open and spacious.
- Energy Efficiency – Modern LED can lights consume less power than traditional incandescent bulbs, helping you save on energy bills.
- Customizable Lighting Design – Can lights can be installed in various configurations to create task lighting, accent lighting, or general illumination.
- Space-Saving Solution – Since these lights are embedded into the ceiling, they don’t take up extra space, making them ideal for small or low-ceiling kitchens.
By strategically placing can lights, you can ensure that every corner of your kitchen is well-lit and functional.
Benefits of Installing Can Lights in the Kitchen
Installing can lights in your kitchen comes with several advantages:
- Even Distribution of Light – Unlike pendant lights that may create shadows, can lights spread light evenly across the kitchen.
- Minimalist Look – Recessed lights blend seamlessly into the ceiling, providing a clean and uncluttered appearance.
- Increased Home Value – A well-lit kitchen enhances the overall appeal of your home, making it more attractive to potential buyers.
- Flexible Placement Options – Can lights can be installed in different locations, including above islands, countertops, and workspaces.
- Dimmable Options – Many can lights support dimmer switches, allowing you to adjust the brightness based on your needs.
Because of these benefits, can lights remain a top choice for homeowners looking to enhance their kitchen lighting.
Step 1: Planning Your Can Light Layout
Before installing can lights in your kitchen, careful planning is essential to ensure optimal lighting coverage, functionality, and aesthetics. A poorly planned layout can lead to uneven lighting, glare, or unnecessary shadows, affecting both the usability and appearance of your kitchen.
The first step in planning involves dividing the kitchen into different lighting zones, as each area requires a different type of illumination. Next, you need to determine the number of can lights needed to achieve balanced brightness while avoiding overcrowding. Finally, selecting the right size and type of can lights ensures they complement your kitchen design and energy efficiency goals.
By taking these factors into account, you can create a well-lit, comfortable kitchen environment that enhances both functionality and aesthetics.
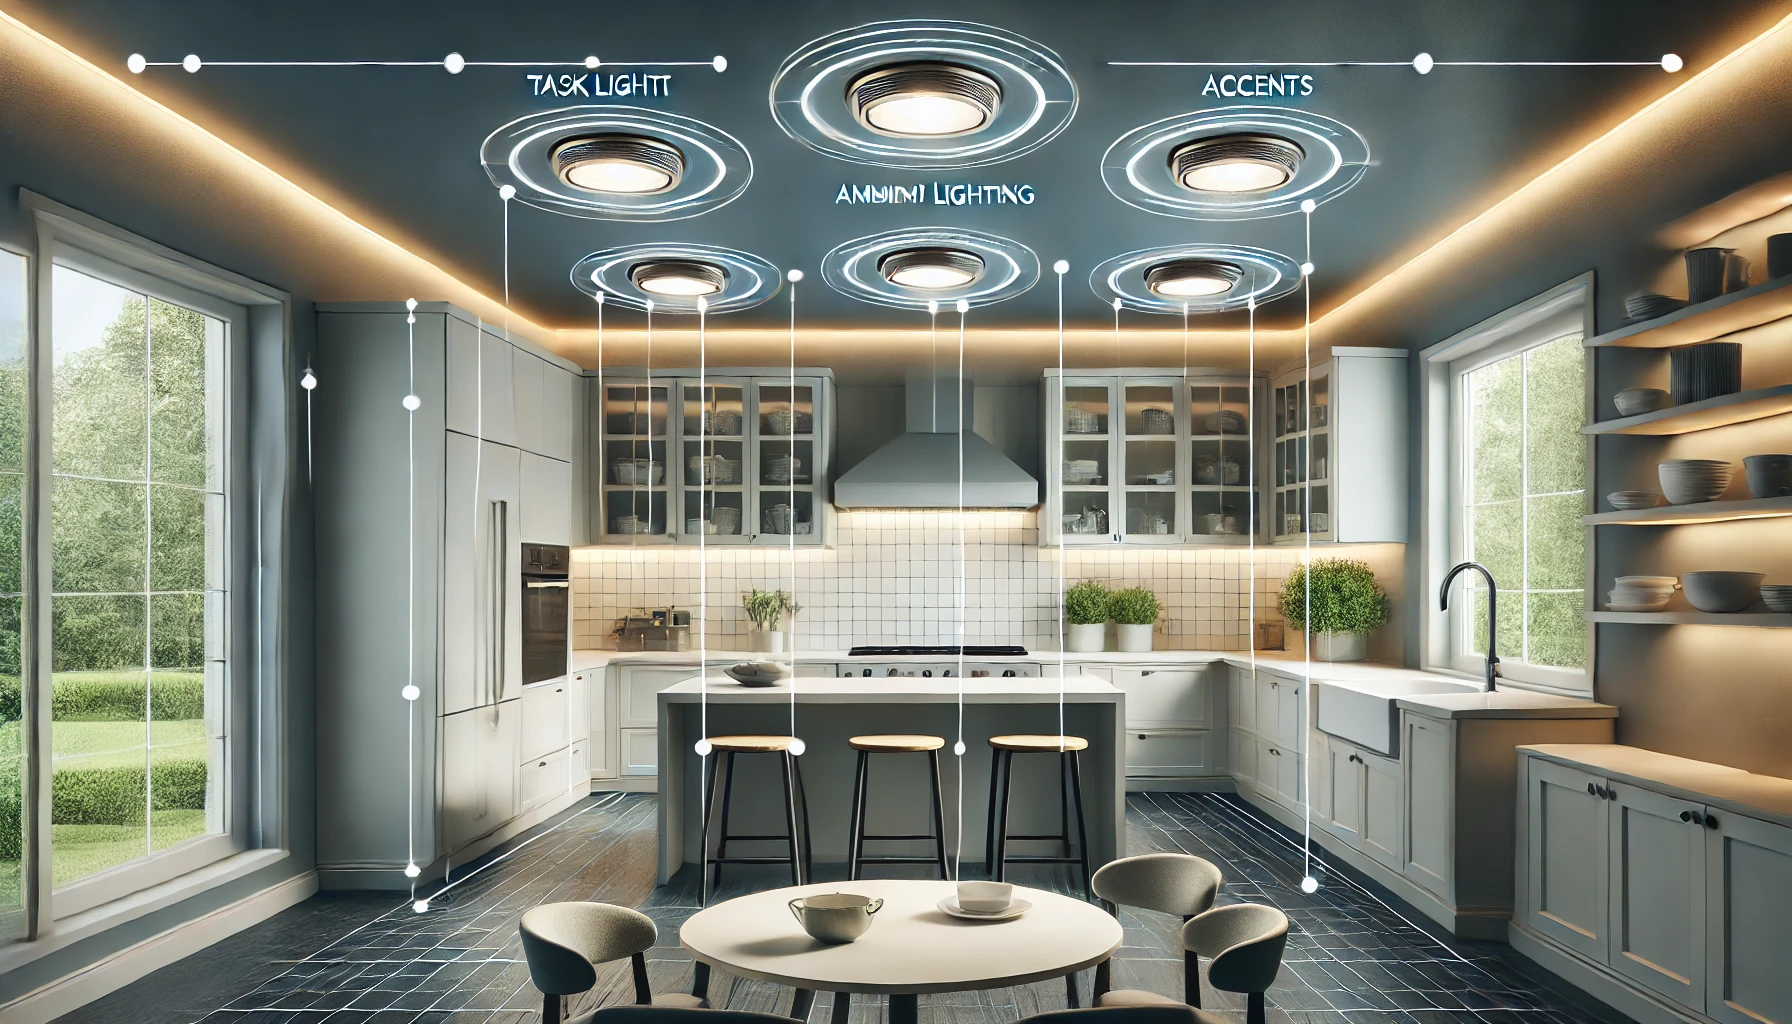
1.1 Understanding Kitchen Lighting Zones
A well-lit kitchen consists of three main lighting layers: task lighting, ambient lighting, and accent lighting. Each plays a different role in making your kitchen more functional and visually appealing.
Task Lighting: Focused Light for Cooking & Food Prep
Task lighting is the most critical type of lighting in a kitchen. It provides bright, focused illumination on areas where precise tasks are performed, such as chopping vegetables, reading recipes, and washing dishes.
Can lights serve as excellent task lighting when placed over countertops, islands, and sinks, ensuring there are no dark spots that hinder visibility. To maximize effectiveness, task lighting should be bright but not overly harsh to avoid discomfort.
Ambient Lighting: General Illumination for the Entire Kitchen
Ambient lighting is responsible for providing overall brightness in the kitchen. It ensures that the room is well-lit, even in areas without direct task lighting.
Can lights are a great choice for ambient lighting because they spread light evenly across the kitchen. Spacing them properly prevents overlapping beams or dark patches, creating a welcoming and functional environment.
Accent Lighting: Highlighting Specific Areas
Accent lighting is used to draw attention to specific design elements in the kitchen, such as backsplashes, cabinets, or architectural features. While not necessary for functionality, it adds depth and character to the space.
Adjustable or directional can lights work well for accent lighting, allowing you to highlight certain areas without overpowering the rest of the kitchen’s illumination.
1.2 Determining the Right Number of Can Lights
Once you understand your kitchen’s lighting zones, the next step is to determine how many can lights are needed. Installing too many can lights can lead to harsh, overpowering light, while too few can leave dim spots.
Several factors influence the required number of can lights, including kitchen size, ceiling height, and existing natural light. A common rule of thumb is to space can lights approximately 4 to 6 feet apart, depending on their brightness and beam spread.
Another key consideration is the wattage and lumen output of the lights. Kitchens generally require higher lumens (brightness) than other rooms, so choosing the right wattage ensures adequate illumination without excessive glare.
1.3 Choosing the Right Size and Type of Can Lights
Selecting the right size and type of can lights is crucial for achieving the desired lighting effect and energy efficiency. The three most common can light sizes are 4-inch, 5-inch, and 6-inch fixtures.
Standard Can Light Sizes (4-inch, 5-inch, 6-inch)
- 4-inch can lights – Best for accent lighting and smaller kitchens.
- 5-inch can lights – Ideal for task lighting and medium-sized kitchens.
- 6-inch can lights – Provides the widest coverage, making it suitable for ambient lighting in large kitchens.
LED vs. Incandescent Recessed Lighting
- LED can lights – More energy-efficient and long-lasting than traditional bulbs.
- Incandescent can lights – Provide a warmer glow but consume more energy.
Choosing the Right Trim for Can Lights
The trim of a can light affects how the light is directed and how it appears in the kitchen. Popular trim styles include:
- Baffle trim – Reduces glare and provides a softer look.
- Reflector trim – Maximizes brightness and works well for ambient lighting.
- Gimbal trim – Adjustable, allowing you to direct light where needed.
By selecting the appropriate size, bulb type, and trim, you can create a lighting setup that enhances both practicality and aesthetics.
Read More: can light placement in kitchen
Step 2: Identifying Key Areas for Can Light Placement
Strategically placing can lights in the kitchen ensures even illumination and prevents shadows or dark spots in important areas. While general ambient lighting covers the entire kitchen, certain zones—like countertops, sinks, and kitchen islands—require focused task lighting.
By identifying key areas for placement, you can enhance both functionality and aesthetics, ensuring every corner of the kitchen is well-lit.
2.1 Can Lights Over Workspaces and Countertops
Proper lighting over countertops and workspaces is essential for safe and efficient meal preparation. If can lights are installed incorrectly, they can cast shadows from upper cabinets or a person standing at the counter, reducing visibility.
Positioning Lights to Avoid Shadows
To avoid unwanted shadows, place can lights slightly in front of countertops rather than directly overhead. This ensures the light beams fall in front of the user, eliminating dark zones.
Ideal Placement Over Kitchen Islands
For kitchen islands, center can lights evenly across the surface, ensuring adequate brightness. A common rule is to space them around 24 to 30 inches apart for optimal coverage.
How to Space Lights Above Countertops
- Keep lights approximately 12 to 18 inches from the edge of the countertop.
- If using multiple can lights, space them 4 to 6 feet apart, ensuring even brightness without over-lighting.
2.2 Can Lights Over the Sink Area
Sinks are another high-activity area where proper lighting is crucial. A poorly lit sink can make washing dishes and food prep difficult and uncomfortable.
Best Placement for Eliminating Shadows
- Install a single can light directly above the sink to provide focused illumination.
- If the sink is near a window, adjust placement to avoid conflicting natural light.
Choosing Waterproof or Damp-Rated Can Lights
Since the sink area is prone to moisture, it’s important to select damp-rated can lights that can withstand humidity. LED fixtures are a great choice because they resist moisture and have a longer lifespan.
2.3 Can Lights Over Kitchen Islands and Dining Areas
Kitchen islands and dining areas often serve multiple purposes, from cooking prep to casual dining. Can lights should provide enough brightness while maintaining a comfortable ambiance.
Recommended Spacing for Even Illumination
- Space lights around 24 to 30 inches apart to create consistent lighting.
- For long kitchen islands, use at least two or three can lights to prevent uneven illumination.
Combining Can Lights with Pendant Lights
For a stylish and functional lighting setup, combine can lights with pendant lights. This balances brightness while adding aesthetic appeal to the space.
2.4 Can Lights Near Cabinets and Backsplashes
Cabinet and backsplash areas can be tricky to light due to glare and reflection. Can lights should be positioned to enhance these areas without creating harsh lighting effects.
How to Install Can Lights Without Creating Glare
- Avoid placing can lights too close to glossy surfaces, as this can produce unwanted glare.
- Use soft white LED bulbs instead of ultra-bright lights to create a warmer, more inviting look.
Using Adjustable Can Lights for Better Control
- Consider gimbal or eyeball-style can lights, which allow you to angle the beam to highlight cabinets or backsplashes effectively.
- Adjustable lighting is particularly useful for display cabinets or decorative shelving.
2.5 Can Lights in Open-Concept Kitchens
Open-concept kitchens often connect with the dining or living room, requiring a smooth lighting transition.
Transitioning Between Kitchen and Living Spaces
- Use can lights to extend the kitchen lighting flow into the living or dining area.
- Consider dimmer switches to adjust brightness based on activity levels.
Coordinating Can Lights with Other Lighting Fixtures
- Ensure can lights complement chandeliers, pendant lights, or wall sconces in nearby areas.
- Stick to warm or neutral lighting tones for a cohesive look.
Read More: how many can lights in a kitchen
Step 3: Installation and Final Adjustments
Once you have planned your layout and identified the key areas for placement, it’s time to move on to installation. Installing can lights requires careful marking, wiring, and adjusting to ensure even illumination and avoid electrical hazards.
Following this step-by-step guide, you’ll be able to install your can lights with confidence and achieve a professional-looking result.
3.1 Marking and Cutting Holes for Installation
Before installing can lights, you need to accurately measure and mark their positions on the ceiling. Proper marking ensures even spacing and prevents uneven or misaligned lighting.
Tools Needed for Proper Installation
To get started, gather the necessary tools:
- Measuring tape
- Pencil or chalk for marking
- Stud finder
- Drywall saw or hole cutter
- Electrical wire stripper
- Screwdriver
Measuring and Marking the Ceiling for Even Spacing
- Measure and mark the positions where each light will be installed. Ensure spacing follows your layout plan (e.g., 24-30 inches apart over kitchen islands).
- Use a stud finder to locate ceiling joists and avoid placing lights too close to them.
- Outline the can light template using a pencil, ensuring the hole size matches your light fixture.
Once the markings are set, you’re ready to cut the ceiling holes.
3.2 Wiring and Connecting Can Lights
Electrical wiring is one of the most critical steps in can light installation. Ensuring safe and proper connections prevents electrical issues and ensures your lights function correctly.
Understanding Electrical Safety Precautions
- Turn off the power at the circuit breaker before working with electrical wiring.
- Use a voltage tester to confirm there is no electricity running to the wires before proceeding.
- If you’re unfamiliar with electrical work, consider hiring an electrician for assistance.
Wiring Multiple Can Lights Together
- Run the electrical cable from the power source (usually an existing ceiling fixture or electrical junction box).
- Connect the black (hot) wire to black, white (neutral) wire to white, and ground wire to the ground screw.
- Secure the connections with wire nuts and electrical tape to prevent loose wiring.
After wiring, the next step is installing and securing the can lights into the ceiling.
3.3 Testing and Adjusting the Lights
Once the lights are installed and connected, you’ll need to test them to ensure even brightness and proper functionality.
Checking Light Intensity and Coverage
- Turn the power back on and check if the lights turn on properly.
- Walk around the kitchen and observe any dark spots or overly bright areas.
Making Adjustments to Improve Aesthetic and Functionality
- If the lighting feels too harsh, consider installing softer LED bulbs.
- If shadows appear, adjust the placement or angle of the lights (if using adjustable can lights).
3.4 Adding Dimmers for Better Light Control
A dimmer switch is a great addition to your can lights, allowing you to adjust brightness based on the time of day and your activity.
Benefits of Using Dimmers in the Kitchen
- Creates a customizable ambiance for cooking, dining, or entertaining.
- Reduces energy consumption and increases bulb lifespan.
Best Dimmer Switches for LED Can Lights
- Look for LED-compatible dimmers to prevent flickering or buzzing.
- Popular choices include Lutron Caseta, Leviton Decora, and TP-Link Kasa Smart Dimmers.
Installing a dimmer switch is a simple process that involves replacing the standard light switch with a dimmable one.
Conclusion About Where to Install Can Lights in the Kitchen
Summary of Key Steps in Installing Can Lights
- Step 1: Plan your can light layout based on task, ambient, and accent lighting needs.
- Step 2: Identify the best placement areas to avoid shadows and achieve optimal illumination.
- Step 3: Install the lights by marking, cutting, wiring, and adjusting brightness.
Common Mistakes to Avoid When Installing Can Lights
- Over-spacing or under-spacing lights, leading to uneven brightness.
- Placing lights too close to cabinets, causing unwanted glare.
- Neglecting dimmer switches, which provide better lighting control.
Final Thoughts on Enhancing Kitchen Lighting
A well-lit kitchen enhances both functionality and aesthetics. By following these steps, you can install can lights effectively and create a warm, inviting atmosphere.