A ceiling fan is more than just a decorative feature—it plays a crucial role in keeping your home cool, comfortable, and energy-efficient. But like any appliance, ceiling fans don’t last forever. Over time, they may become noisy, inefficient, or outdated. When that happens, replacing your ceiling fan is often the best solution.
The good news? You don’t always need a professional to get the job done. With the right tools and a careful approach, replacing a ceiling fan can be a straightforward DIY project. In this complete guide by Builtup Home, we’ll walk you through everything you need to know—from preparation to installation—so you can confidently upgrade your ceiling fan.
Understanding When It’s Time to Replace Your Ceiling Fan
Before jumping into the process, it’s important to recognize when your ceiling fan needs replacement. Common signs include persistent wobbling, unusual noises, reduced airflow, or flickering lights. In some cases, the motor may stop working entirely. You might also want to upgrade simply to improve your room’s design or switch to a more energy-efficient model.
Modern ceiling fans often come with advanced features like remote controls, smart connectivity, and improved motor efficiency—making replacement a worthwhile upgrade.
Tools and Materials You’ll Need
Preparation is key to a smooth installation. Before you begin, gather all the necessary tools and materials. These typically include a sturdy ladder, screwdrivers, pliers, a voltage tester, wire connectors, and your new ceiling fan kit.
Having everything within reach will save time and reduce the chances of making mistakes during the installation process.
Safety Comes First
Working with electricity is not something to take lightly. The most important step in this entire process is ensuring your safety.
Always turn off the power at the circuit breaker—not just the wall switch. Use a voltage tester to confirm that no electricity is flowing to the wires. Make sure your ladder is stable and placed on an even surface. Avoid touching any exposed wires, and never rush through the process.
Remember, ceiling fans are heavier than light fixtures, so proper mounting is essential to prevent accidents.
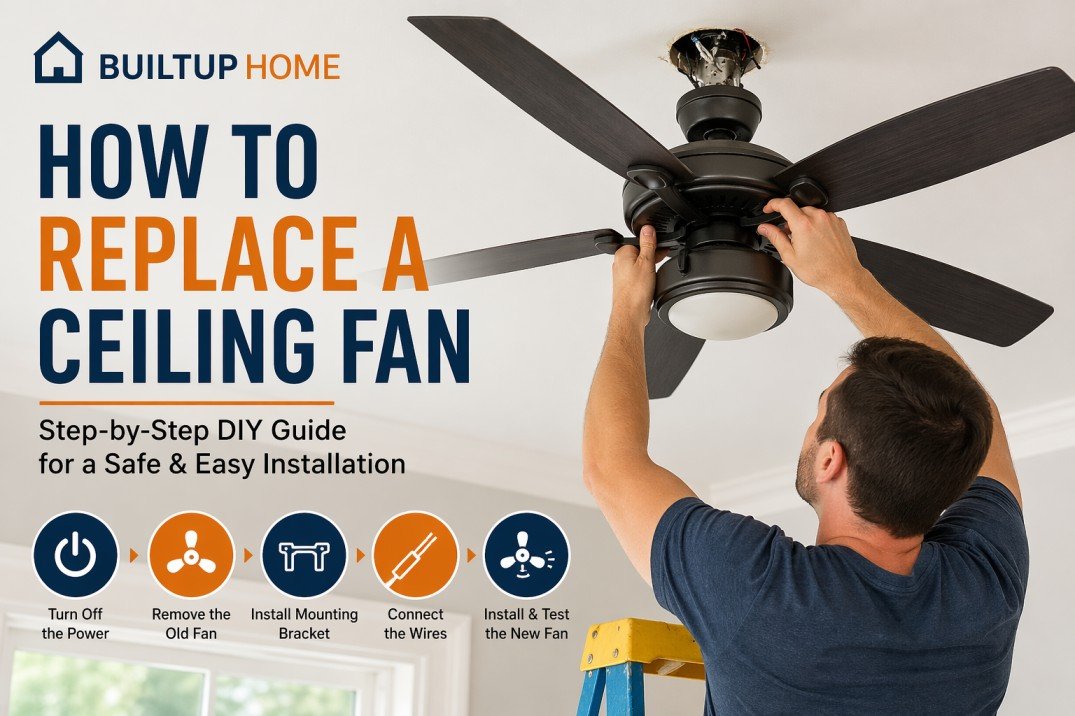
Step-by-Step Guide to Replacing a Ceiling Fan
Step 1: Turn Off the Power
Start by switching off the circuit breaker that supplies power to the ceiling fan. Double-check with a voltage tester to ensure the wires are not live. This step is non-negotiable and ensures your safety throughout the project.
Step 2: Remove the Existing Ceiling Fan
Carefully disassemble the old fan. Begin by removing the light bulbs and any glass covers. Next, unscrew and detach the fan blades to make the unit lighter and easier to handle.
Once that’s done, remove the canopy (the cover near the ceiling) to expose the wiring. Disconnect the wires and gently lower the fan. Finally, remove the mounting bracket attached to the ceiling box.
Take your time during this step to avoid damaging the wiring or ceiling.
Step 3: Check the Electrical Box
This is a critical step that many people overlook. Ceiling fans require a fan-rated electrical box, which is designed to support their weight and movement.
If your existing box is not fan-rated, you’ll need to replace it before proceeding. Installing a ceiling fan on a standard light box can be dangerous and may lead to the fan falling.
Step 4: Install the New Mounting Bracket
Your new ceiling fan will come with a mounting bracket. Secure this bracket to the electrical box using the provided screws. Make sure it is tightly fastened and properly aligned.
A secure mounting bracket is essential for a stable, wobble-free fan.
Step 5: Assemble the New Ceiling Fan
Before attaching the fan to the ceiling, assemble its main components according to the manufacturer’s instructions. This usually involves attaching the downrod (for higher ceilings) or preparing it for a flush mount (for lower ceilings).
Carefully thread the wires through the downrod or housing to keep everything organized.
Step 6: Connect the Wiring
Now comes the electrical connection. Match the wires from the ceiling to those on the fan:
- Black wire connects to the hot (live) wire
- White wire connects to the neutral wire
- Green or bare wire connects to the ground
Secure each connection with wire connectors and wrap them with electrical tape for added safety.
If you feel unsure at this stage, it’s wise to consult a professional electrician rather than risk incorrect wiring.
Step 7: Attach the Fan to the Ceiling
Lift the fan and attach it to the mounting bracket. Many fans include a hook or support mechanism to hold the fan while you secure it.
Tighten all screws firmly and ensure the fan is stable. A properly secured fan will operate smoothly without shaking.
Step 8: Install the Blades and Light Kit
Attach the fan blades one by one, making sure they are evenly aligned. If your fan includes a light kit, install it according to the instructions, then add bulbs and covers.
Balanced blades are essential for preventing wobbling and ensuring quiet operation.
Step 9: Restore Power and Test the Fan
Once everything is installed, turn the power back on at the circuit breaker. Test the fan at different speeds and check the light function.
Listen for unusual noises and observe whether the fan wobbles. If needed, tighten screws or use a balancing kit to correct any issues.
Common Mistakes to Avoid
Even a simple project like this can go wrong if you’re not careful. One of the most common mistakes is failing to turn off the power completely. Another is installing the fan on a non-fan-rated electrical box.
Loose screws, incorrect wiring, and uneven blade installation can also cause problems like wobbling or poor performance. Always follow the manufacturer’s instructions and double-check your work.
When Should You Call a Professional?
While many homeowners can replace a ceiling fan themselves, there are situations where professional help is the better choice. If your home has old or damaged wiring, if the ceiling box needs replacement, or if you’re simply unsure about any step, hiring an electrician can save time and prevent potential hazards.
Tips for Long-Term Performance
To get the most out of your new ceiling fan, choose the right size for your room and clean the blades regularly to prevent dust buildup. Periodically check and tighten screws to maintain stability.
If possible, opt for a fan with modern features like remote control or smart functionality for added convenience.
Final Thoughts
Replacing a ceiling fan is a rewarding home improvement project that can instantly enhance both comfort and style. With careful preparation, the right tools, and a focus on safety, you can complete the task successfully—even as a DIY beginner.
However, never compromise on safety. If anything feels uncertain, it’s always best to seek professional assistance.
FAQs
How long does it take to replace a ceiling fan?
It usually takes between 2 to 4 hours, depending on your experience and the complexity of the installation.
Can I replace a ceiling fan myself?
Yes, as long as you follow safety precautions and understand basic wiring.
Do I need a special electrical box?
Yes, a fan-rated electrical box is necessary to support the weight and movement of the fan.
Why is my ceiling fan wobbling after installation?
Wobbling is often caused by loose screws, uneven blades, or improper mounting.