Installing a ceiling fan mounting bracket is one of those home improvement tasks that looks simple at first glance but actually plays a crucial role in safety, stability, and long-term performance. A properly installed bracket ensures that your ceiling fan remains firmly attached to the ceiling, runs smoothly without wobbling, and operates safely for years.
At Builtup Home, this guide will walk you through the complete process of ceiling fan mounting bracket installation in a clear, practical, and beginner-friendly way. Whether you’re replacing an old fan or installing a new one, understanding the correct method will help you avoid common mistakes and ensure a secure setup.
Understanding the Role of a Ceiling Fan Mounting Bracket
Before starting the installation, it’s important to understand what the mounting bracket actually does. This small metal component is responsible for holding the entire weight of the ceiling fan and connecting it to the electrical box or structural support in the ceiling.
It serves several essential purposes:
- It provides a strong support point for the fan motor
- It ensures the fan remains stable during high-speed rotation
- It reduces vibration and wobbling
- It safely secures electrical wiring connections
Without a properly installed bracket, even a high-quality fan can become unsafe over time.
Preparing for Installation
Preparation is the most important part of the process. Before climbing the ladder, you should gather all necessary tools and make sure the installation area is safe.
You will need basic tools such as a screwdriver set, an electric drill (especially for concrete ceilings), a voltage tester, a measuring tape, and a stable ladder. It’s also important to have screws and wall anchors if you’re working with a concrete ceiling.
Safety should always come first. Turn off the power supply from the main breaker before touching any electrical components. Use a voltage tester to confirm that no electricity is flowing through the wires. This step is critical and should never be skipped.
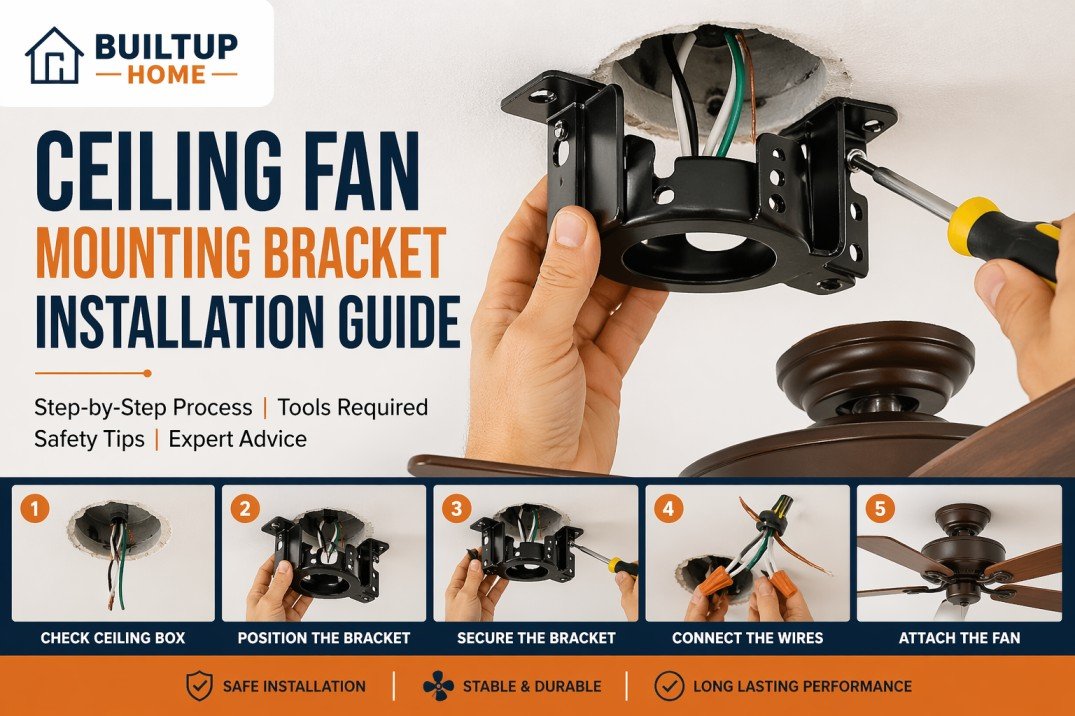
Checking the Ceiling Box
One of the most overlooked steps in ceiling fan installation is checking the electrical box. Not all ceiling boxes are designed to hold a fan. A proper fan-rated box is specifically built to handle both the weight and vibration of a spinning fan.
If your existing box is loose, plastic, or not labeled for ceiling fan use, it must be replaced before continuing. Installing a fan on an incorrect box can lead to serious safety risks.
Installing the Mounting Bracket Step by Step
Once the preparation is complete, you can begin installing the mounting bracket.
Start by positioning the bracket against the ceiling box. Carefully guide the electrical wires through the center opening of the bracket. Align the screw holes so that the bracket fits perfectly against the ceiling surface.
Next, secure the bracket using the screws provided with your fan kit. Tighten them evenly to ensure the bracket sits flat and stable. Avoid over-tightening, as this may damage the electrical box or strip the screws.
If you are installing the fan on a concrete ceiling, the process is slightly different. You will need to drill holes, insert wall anchors, and then secure the bracket using expansion screws. For wooden ceilings, screws should be fixed directly into the ceiling joist or a strong support beam for maximum stability.
After tightening the screws, gently test the bracket by pulling it downward slightly. If there is any movement, it must be corrected immediately before proceeding.
Wiring Preparation
Once the bracket is securely installed, the next step is preparing the wiring. Although this is not the final electrical connection stage, it is important to ensure the wires are properly organized and accessible.
Typically, you will connect the neutral wire (white), live wire (black), and ground wire (green or bare copper). All connections should be securely insulated using wire nuts to prevent any electrical hazards.
If you are not confident handling electrical wiring, it is always safer to consult a professional electrician.
Attaching the Ceiling Fan
After the bracket and wiring are ready, the final step is mounting the fan itself. Most ceiling fans are designed to hook directly into the bracket or downrod system.
Carefully lift the fan motor assembly and attach it to the mounting bracket. Secure all locking mechanisms, pins, or screws as instructed by the manufacturer. Once the fan is attached, install the canopy cover to hide the bracket and wiring for a clean finish.
At this stage, you should double-check that everything is tightly secured and properly aligned before restoring power.
Common Installation Mistakes to Avoid
Many installation problems occur due to simple mistakes. One of the most common is using a non-fan-rated electrical box. Another is failing to properly tighten the mounting screws, which leads to wobbling or noise during operation.
Installing a bracket without locating a ceiling joist or support beam is also a major issue, especially in wooden ceilings. Additionally, skipping safety checks like voltage testing can lead to serious electrical hazards.
Avoiding these mistakes ensures a safer and more reliable installation.
Professional Tips for Better Results
To achieve the best results, always choose a high-quality metal mounting bracket instead of cheaper alternatives. Make sure everything is level before tightening the final screws. This helps prevent imbalance and reduces long-term wear on the fan motor.
It is also a good practice to inspect the bracket once a year, especially in areas with heavy fan usage. Regular maintenance helps maintain safety and performance.
Final Thoughts
Ceiling fan mounting bracket installation is a critical step that directly affects the safety and performance of your fan. While the process may seem technical, it becomes straightforward when done step by step with proper preparation and attention to detail.
By following this guide from Builtup Home, you can confidently install a ceiling fan bracket that is strong, stable, and built to last. Taking the time to do it correctly ensures not only comfort but also long-term safety in your home.